I’m not knocking anyone’s hustle. However, the price of a prepared honey, baked ham from a restaurant is expensive! Especially considering how easy it is to prepare your own. I know, I pay for convenience a lot, too. But, come on! This ham is way too simple not to do it yourself and save at least 30 clams!
First pro, the thing is already FULLY cooked! You’re basically just heating it up to serve. Make sure you purchase a spiral ham. It’s cooked and most of the time it’s already sliced! A win is a win.
I like to bake the ham for 10 minutes per pound. I start by warming the ham on 300 F for the bulk of the total baking time. Then, I add the glaze and continue baking for the last 30 minutes on 425F. This will render the perfect ham every time!
Glazed Like a Donut
The ham comes with a glaze packet. Yeah, throw it away. My homemade glaze is very simple with minimal ingredients. But, the flavor is incredible! I initially pour the glaze on the ham while the glaze is still hot and thin. This will help the flavor of the glaze penetrate the meat better. The glaze will thicken as it stands. So, I like to reserve a little of it to brush on the ham after it’s done baking right before serving.
Delicious and incredibly easy to prepare honey baked ham recipe that is comparable to expensive restaurants.
Ingredients
8-11lbsspiralfully cooked ham
4tbsunsalted butter
1 1/2cupbrown sugarpacked
1/2tspallspice
1/2tspgarlic powder
1/4cuppineapple juice
1/4cupCoca Cola
1/2cuphoney
Instructions
Preheat oven to 300°F
Place ham in an aluminum foil lined roasting pan or a disposable roasting pan
Cover the ham with foil
Bake for 1 hour*
In a sauce pan, melt the butter
Stir in all remaining ingredients
Simmer on medium heat for 5 minutes (Glaze will thicken as it stands)
Remove the ham from the oven and discard the foil covering.
Increase the oven temp to 425°F
Pour and brush the glaze all over the ham evenly reserving 1/2 cup of the glaze for later.
Place the ham back into the oven for 15 mins, uncovered.
Remove the ham from the oven
Pour or brush the remaining glaze over the ham
Place the ham back into the oven for 15 additional mins. uncovered.
Allow ham to rest for 10 minutes before serving.
Enjoy!
Recipe Notes
*Heat the ham for 10 minutes per pound minus 30 mins. Example: if ham is 9 lbs, the total baking time will be 1 hour and 30 mins. Heat the ham for 1 hour before adding the first layer of glaze. Reserve the last 30 minutes for baking with the glaze applied.
I’m embarrassed to admit that before making this recipe, I’d only tried eggnog once. It was store bought. I hated it. So, when it was requested many, many times that I share a recipe I was nervous. I didn’t think I could produce a great recipe for something I hated. Then, I made it homemade. Game changer! This stuff is liquid gold! It’s so dang silky and creamy! And if you add booze, it’ll sneak up on you! It’s so decadent that you forget it contains liquor. Until you stand up. Ha!
I Ain’t Tempering Eggs!
And I meant that! I feel like tempering eggs are allowing the eggs to control. I know. I’m a psycho. But, you can keep the whole tempering mess by whisking and whisking well! I find that the eggnog is a lot smoother when you beat the heck out of the eggs and sugar mixture. Then, add in the milk and cream and beat it well again. You won’t need to use a strainer to remove the clumps. But, make sure to whisk well while heating. Nothing worst than scrambled eggnog! Yuck!
All the Spice!
I don’t care for nutmeg. There. I said it. It just isn’t one of my favorite spices. I HIGHLY recommend that you try allspice in this recipe instead. It tastes like a mixture of nutmeg, cinnamon, and cloves all in one! It is absolutely divine in my eggnog! You do not need to use much as it can be overpowering. Oh! Don’t forget the salt. Sweets need a little pinch of salt. If you’ve ever thought to yourself that “something is missing” when you taste a dessert, it’s the salt. You need a little.
Reaching Peaks
I only use egg yolks in the beginning of the recipe. But, don’t discard the whites. I like to whip them up and fold it into the eggnog. That will gives us some Bill Gates richness to our eggnog! Before chilling, the eggnog will seem super thick and frothy. No worries. After chilling the consistency will be literally perfect! Nice and silky smooth!
To Booze or Not to Booze? BOOZE!
Adding alcohol is completely optional. If kids will be partaking, of course, you want to keep it G. But, if this is an adult shindig, get to pouring the brown stuff. Hennessy is my go to for eggnog. It just feels, and tastes, right! You know? Rum, brandy, bourbon…whatever you prefer will be great as well. Top to off with a sprinkling of cinnamon or nutmeg and enjoy that warm and fuzzy feeling!
Ever since I posted my fried Turkey Wings recipe, I’ve been bombarded with recipe requests for the fried version. Finally it’s here! This is pure comfort food! Tender and juicy turkey wings smothered in a thick, savory brown gravy! And the gravy is made from scratch using pan drippings. I worked hard to make this recipe easy peasy!
Spice it Up!
Everyone knows I LOVE a good spice blend. And we definitely have one for these wings! Not too salty and not spicy at all. But, yet, super flavorful. I used my favorite poultry seasoning. Feel free to use yours.
Wangz vs Wings
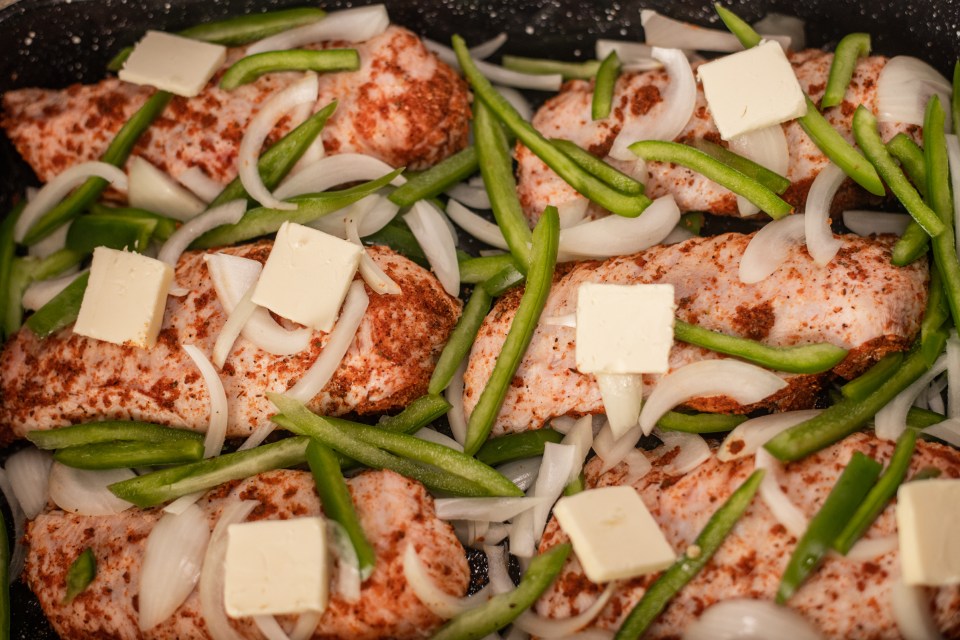
My local grocery store’s meat department precut my wings or WANGZ! Hallelujah! That saves me some time. No worries if your wings are whole. A quick chop at the joints is all it take. The difference between wings and wangz? Keep scrolling to see how I jazz them up! I like to add thin slices of onion, bell peppers, and butter. This add a ton of flavor during the baking time. The butter also helps tenderize the meat and keep it moist. So, don’t keep our on that!
It’s All Gravy, Baby!
After baking the wings for awhile, I drain off the rendered pan drippings. I use the fat at the top of the drippings for my gravy. Combine it with flour and you’ll have an amazing roux! A great roux is the foundation to the perfect gravy!
My recipe will yield turkey wing meat that literally slides off the bone! The gravy will thicken even more and stick to the wangz! I serve it all over rice. Throw in some veggies and cornbread for good measure and GOOD EATIN’!
Southern style, tender, and juicy turkey wings smothered in a thick, savory, homemade gravy made from pan drippings!
Ingredients
Turkey Wings:
6-8cut turkey wings
2TBSpoultry seasoningI use Chef Paul’s Poultry Magic
1-2TBSCreole or Cajun seasoningI use Zatarain’s
1TBSonion powder
1TBSpaprika
1tspgarlic powder
1/2tspcelery salt
1TBSAccentoptional
1onionsliced
1bell peppersliced
1/2stick unsalted butterslice thinly
Gravy:
Pan drippings from wings
1/2cupall purpose flour
3cupschicken stock or broth
2tsponion powder
1tspgarlic powder
Salt and pepper to taste
Instructions
Turkey Wings:
Preheat oven to 350°F
Rinse the wings and pat dry with paper towels
Mix all spices together in a small bowl
Sprinkle the spices over the turkey wings and toss the wings to coat evenly.
Spray and large roasting pan with nonstick cooking spray
Lay the wings in the pan
Add the onions, bell peppers, and butter into the pan.
Cover the pan with aluminum foil
Bake for 1 hour and 15 mins
Remove pan from the oven
Drain the pan drippings into a bowl or measuring cup.
Place the wings back into the oven uncovered while you make the gravy.
Gravy:
Use a fat separator cup or skim 1/2 cup of the fat off the top of the pan drippings. Reserve the rest of the drippings.
Pour the fat into a pot and heat on medium high.
Whisk in the flour for 2-3 minutes to cook out the flour taste
Pour in the chicken stock while whisking
Then, pour in the remaining pan drippings.
Add in the onion and garlic powders
Continue stirring until the gravy thickens; about 3 minutes. (Will thicken more in the oven)
Remove from heat.
Taste and adjust seasoning as desired.
Pour gravy on top of the wings.
Cover the pan with foil again.
Bake for an additional 30-40 mins* or until wings are tender and cooked completely
Serve over warm rice
Enjoy!
Recipe Notes
*Turkey wing sizes differ. Bake the wings until they are fork tender. This timing may vary. My wings may be smaller than yours. Additional timing may be needed.
I think I’ve gone overboard. In the best way though! This by far the cheesiest Mac and Cheese I’ve ever had! I mean, doesn’t your teeth ache just looking at all of the cheese in the photo?? I managed to retain that creamy texture too. If you can’t already tell, I’m damn proud of this ooey gooey goodness!
I love boiling the elbow macaroni in chicken broth. It adds a ton of flavor. It almost taste like the mac and cheese contains meat. It helps reduce the amount of seasoning you have to add later on.
I never ever rinse pasta. I always stir in a small amount of butter. This stops the cooking process. Yes, sometimes food will continue to “cook” even after being removed from heat.
I use a total of 5 different cheeses in this recipe. Feel free to use your favorites. I add in half of the cheese while the mac and cheese is cooking over the burner. Then, I sprinkle on the rest over the top in the casserole dish.
Look at that crisp cheese pull! The topping is not too crunchy, it’s just right! The perfect coverage for that creamy, cheesy stuff underneath. If you like a brown, almost burnt, looking topping, just leave it in the oven until it reaches the desired look.
I have to warn you. One spoon of this is at least 3,000 calories. So, I recommend eating it at the gym.
WARNING: DO NOT EAT THIS CAKE AND DRIVE! No, seriously. It’s that strong! But, boy is it delicious! Just be prepared to take a good nap afterwards. Of course, this cake is NOT for children. Give them a Little Debbie cake or something. This one is strictly for the grown ups.
Drunken Nuts?
Let me explain. This recipe is called Boozy for a reason. Every aspect is soaked in rum! Whether you use walnuts like me, or pecans, soak them up with that good old rum. I’m using dark rum, but any is fine. Use your favorite.
Pudding Pop
Many use boxed cake mix for their Rum Cakes. Which is cool, I just like to give you guys a recipe from scratch. However, I do add in box of instant French Vanilla pudding mix. It adds the perfect amount of sugar and moisture. This rum cake is incredibly moist because of it. It also gives the cake a buttery, yellow hue. I enjoy the consistency of this cake batter. It’s not too thick and not too thin.
Spaghetti??
I never really have skewers on hand. And my toothpicks were too short. So, to ensure that the rum filled glaze reaches all the way through the cake, I used a spaghetti noodle to poke holes all over the cake. Yes, spaghetti! It works like a charm. But, if you happen to have a skewer, use that. Don’t be shy with the holes. Poke away! This will help that sinful sauce seep all throughout the cake.
Give it Time
At least allow the cake 4 hours to soak up all of that glaze. I know it’ll be hard to wait. But, it’s so worth it! Once you pour in all of the glaze, allow the cake to cool completely. Then, cover the whole cake, pan and all, with plastic wrap. And let it chill out on the kitchen counter all night. Then, flip that baby over in the morning and enjoy!
Booze soaked and incredibly moist rum cake topped with sugary walnuts.
Prep Time20minutes
Cook Time1hour
Resting Time8hours
Total Time9hours20minutes
Servings15pieces
Ingredients
Nuts
1cupchopped walnuts or pecans
1TBSbrown sugar
1tspground cinnamon
2TBSrumoptional
Cake
1stick salted buttersoftened
1 1/2cupgranulated sugar
1/2cupvegetable oil
4eggsroom temp
1tspvanilla extract
1tspbutter extractoptional
2cupscake flouror all purpose flour
1TBSbaking powder
3.4ozbox french vanilla pudding mix
1/2cupwhole milkroom temp
1/2cuprumlight, dark, or spiced
Nonstick cooking spray
Extra flour for dusting
Glaze
1stick salted butter
1 1/4cupsugar
1/3cupwater
1tspvanilla extract
1/3 cup rumlight, dark, or spiced
Instructions
Nuts
Mix all ingredients in a small bowl
Set aside.
Cake
Preheat oven to 325 F
Spray a Bundt pan with nonstick cooking spray and dust it with flour tapping out he excess
Pour the nuts into the bottom of the pan evenly; set aside
In a mixing bowl, combine the butter, sugar, and vegetable oil
Mix until well combined using an electric mixer; about 3-4 minutes.
Add in the eggs one at a time mixing in between each addition
Add in the extracts
In a separate bowl, sift in the flour, baking powder, and pudding mix.
Add half of the flour mix into the wet batter
Pour in the milk
Using the electric mixer, mix on a medium speed until the flour is no longer visible
Add in the rest of the flour mix and the rum.
Mix again until the flour is no longer visible. Be sure to scrap down the sides of the bowl.
Pour the batter into the Bundt pan on top of the nuts.
Gently shake and tap the pan to evenly distribute the batter.
Bake for 50 to 60 minutes or until a toothpick inserted into the cake comes out clean.
Allow the cake to cool while working on the glaze.
Glaze
In a saucepan, melt the butter.
Add in the sugar and water.
Stir and bring the mixture to a rolling boil
Lower the heat to simmer.
Simmer for 6 minutes without stirring.
Remove from heat.
Add in the rum and vanilla extract*
Using a skewer or uncooked spaghetti noodle, poke holes all over the cake.
Slowly pour the glaze, a little at a time, over the cake.
Allow the cake to cool to room temperature
Wrap the cake in plastic wrap and allow it to sit for at least 6 hours (preferably overnight)
Flip the cake over onto a cake plate.
Enjoy!
Recipe Notes
*If you’d like to make the cake less “boozy”, add in the rum during the cooking process when adding in the water and sugar. This will cook out the alcohol content.
**This cake freezes beautifully. Wrap in multiple layers of plastic wrap them place in an air tight zipped freezer bag. If frozen properly, this cake will last for up to a year.
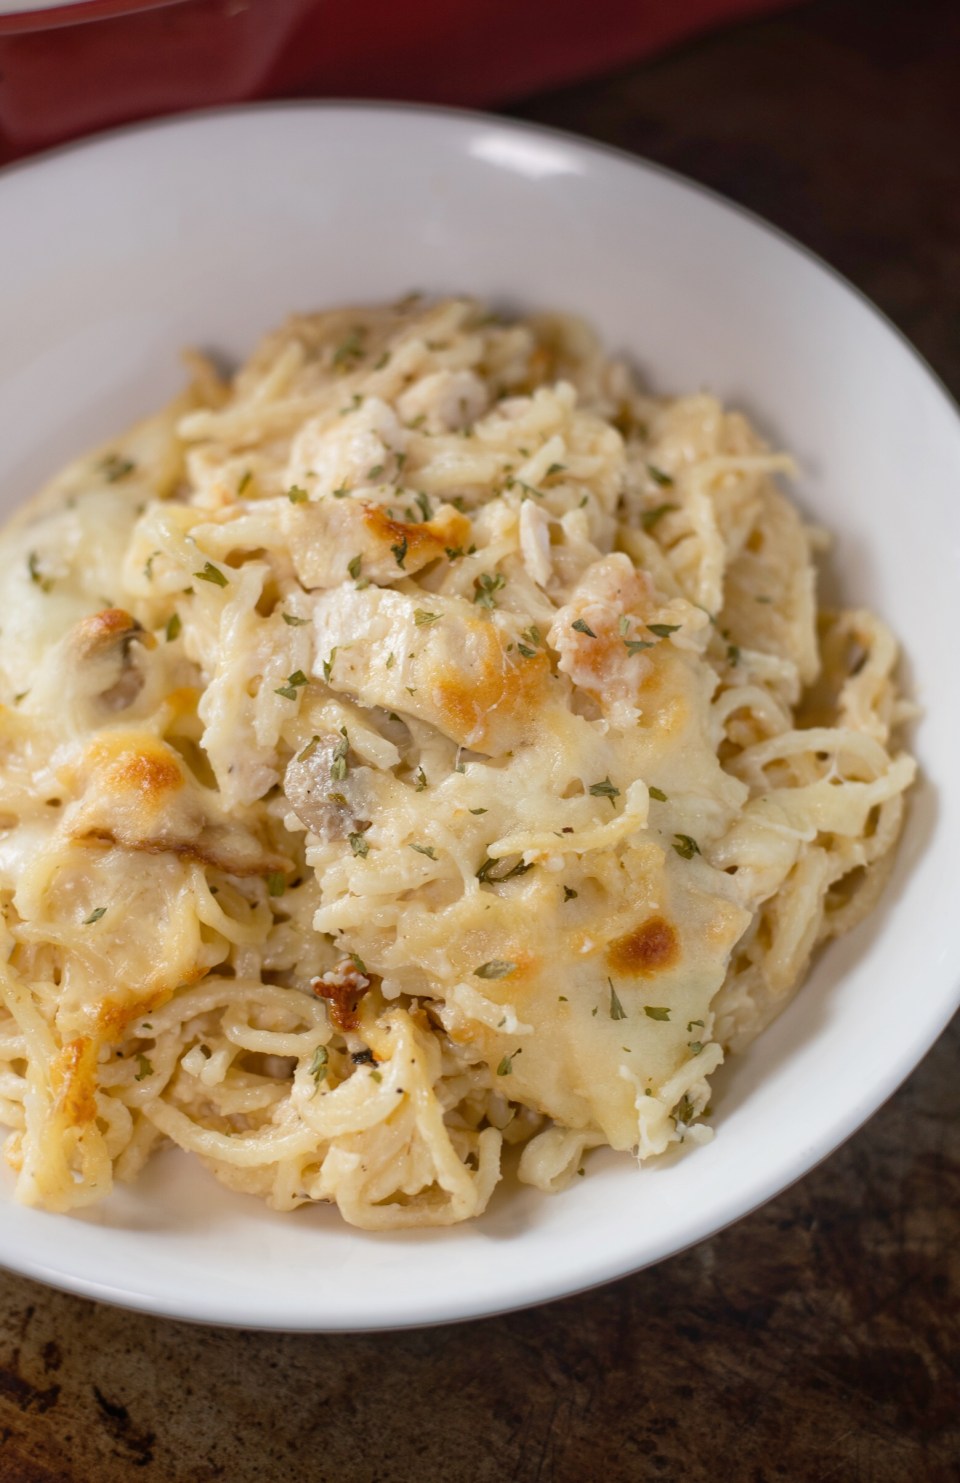
“I don’t know. But, Paul love it!” If you know what I’m referencing, tell me below in the comments! That leftover turkey from Thanksgiving makes a bomb sandwich! But, if you’re tired of meat and bread and would like to try something different, my Turkey Tetrazzini is for you! Creamy, cheesy, and easy to make. You’ll look forward to having leftovers!
Casserole, but Better…
I use thin spaghetti for this recipe, because regular spaghetti is weird. I know, I’m the weird one. I just prefer the thinner noodles. They allow a creamier consistency as they do not absorb as much sauce as the regular sized spaghetti. Cook them al dente and drain. Do NOT rinse.
Pick a Bird.
I like to cut my turkey up into cubes. But, you can shred it if you’d like. You can also use chicken for this recipe as well. The rotisserie chicken at the supermarket will work perfectly as a substitute.
I use shredded Mozzarella and Parmesan. Bake it uncovered for about minutes. Or until it’s as brown as you prefer. Cheesy goodness!
No Chill.
The best part about this recipe is that you don’t have to wait for it to cool! Dive in! Especially if you like a creamier casserole. If you like it a little stiffer, wait for 15 minutes before digging in. Don’t burn your mouth though! Give it a little blow first.
The perfect solution for that leftover Thanksgiving turkey! Creamy, cheesy, and extra delicious. This recipe will be your new go to for leftover turkey.
Prep Time10minutes
Cook Time30minutes
Total Time40minutes
Servings6people
Ingredients
2cupscookedleftover turkey (cubed)
1lbthin spaghetticooked
1cupsliced mushrooms
1/2cupdiced onions
1TBSminced garlic
5TBSunsalted butter
3TBSall purpose flour
1cupchicken stock
12ozcan evaporated milk
1cuphalf and half
4ozcream cheesesoftened
2tspdried basil
1TBSonion powder
2cupsshredded Mozzarella
2cupsshredded Parmesan
Salt and pepper to taste
Instructions
Preheat oven to 375 F
Melted butter in a large pot
Add in mushrooms and onions
Sauté for 2-3 minutes
Add in the garlic and sauté for 30 secs
Sprinkle in the flour and whisk until it’s no longer visible.
Pour in the chicken stock while whisking
Bring it to a low boil
Pour in the evaporated milk and half and half
Stir and bring it to a simmer
Add in the basil, onion powder, and salt and pepper to taste
Stir in 1 cup of the Parmesan cheese.
Add in the spaghetti, the turkey, and 1 cup of the Mozzarella
Stir well to combine
Taste and adjust seasoning as needed.
Spray a 9 x 13 casserole dish with nonstick cooking spray.
Pour the mixture into the dish
Sprinkle the remaining cheeses evenly on the top
Bake, uncovered, for 25 minutes or until cheese has melted.
I can’t tell you the last time I’ve baked a Thanksgiving turkey. Ever since we’ve started frying them, we’ve been hooked! I can’t take credit for this recipe. It’s all my honey’s idea and technique. And it works everything. He was gracious enough to share his delicious Cajun Fried Turkey recipe with my Cookies. He even filmed the tutorial for you on his birthday. Send him virtual hugs for his selflessness.
To Wash or Not to Wash…
Listen, as for me and my house, we shall wash our birds! I know there is a huge debate over the matter. But, I prefer to at least rinse my poultry in cold water. Babe likes to add lemon juice to the water and thoroughly rinse off the turkey. Then, you MUST pat the turkey completely dry using paper towels. Inside and out.
He uses two different injectable marinades for the turkey. One is store bought and the other is homemade. Why two? Because it’s damn delicious! I don’t question his recipe. It works.
The homemade marinade contains actual butter. The store bought version doesn’t. I know. It says Cajun Butter in its name. But, check the ingredients. There is no butter listed. It makes sense though. The butter could possibly congeal during the shelf life of the product. Since, we’re using the homemade version almost immediately, it’s all good.
Stick em up!
Using the injector provided by the store bought marinade, he injects each part of the turkey twice. Once with the store bought jar and once with the homemade version. Don’t forget to flip the bird over and inject butt! If there is any marinade left over, pour it over the turkey. Cover the bird with foil or place into a marinading bag and refrigerate overnight.
Before you fry, allow the turkey to sit out at room temperature for 20-30 mins. Be sure to spray the basket of the deep fryer with nonstick cooking spray prior to placing the turkey in it. The last thing we want is for the turkey to stick to the basket and pull off that crispy skin!
This process can be done in a large frying pot over a propane burner. But, to be honest, neither one of us has done it that way. This large deep fryer seems to be the easiest method. Just look up a turkey fryer on Amazon or Google. Our turkey was 15 lbs. You want to fry the turkey for 4 minutes per pound.
When the turkey is done, lift the basket out of the fryer and allow the turkey to sit in the basket and drain for a few minutes. This is the time where you check the temperature using a meat thermometer to ensure that the turkey is completely done. It should register to at least 170 F in each part of the bird.
Allow the turkey to rest for 15 minutes before carving and serving. Easier than you thought right?
A flavorful twist on a Thanksgiving favorite. This Cajun marinade inject turkey is deep fried to perfection in this to follow recipe.
Prep Time1day
Cook Time1hour10minutes
Total Time1day1hour10minutes
Ingredients
Turkey:
13-15lbturkey
16ozCajun Butter Injectable Marinade
Homemade Marinaderecipe below
Peanut oil for frying
Nonstick cooking spray
Homemade Marinade:
1stick unsalted butter
2TbsCajun or Creole seasoning
1Tbsonion powder
1Tbsgarlic powder
2tspcayenne pepper
2tspcracked black pepper
2tspAccent seasoningoptional
2cupschicken stock
Instructions
Homemade Marinade:
Melt the butter in a saucepan
Whisk in all spices
Pour in the chicken stock while whisking
Bring mixture to a boil
Lower heat to a simmer
Simmer for 5 minutes
Remove from heat and allow marinade to cool at room temperature
Turkey:
Rinse the turkey with water and pat dry thoroughly with paper towels
Inject each part of the turkey with both marinades. If there is any leftover marinade after injecting each part of the turkey twice, pour the remaining marinade over the turkey.
Refrigerate overnight
Pour enough peanut oil to reach the “Max Fill Line” of a large deep fryer.
Heat oil to 375 F
Spray the basket of the deep fryer liberally with nonstick cooking spray
Add the turkey to the basket
Carefully lower the turkey into the fryer
Fry the turkey for 4 minutes per pound of the turkey. (4 minutes x the weight of the turkey)
Remove the basket from the oil and allow the excess oil to drain from the turkey
Use a meat thermometer to check each part of the turkey. Make sure the thermometer registers at 170 F.
Allow turkey to rest for 15 mins before carving.
Enjoy.
Recipe Notes
Be sure to use fire proof gloves while placing the turkey in and out of the fryer and oil.
I sing the praises of the pressure cooker creators all day. The pressure cooker has become one of my top 3 favorite kitchen gadgets. It just frees up your hands and time so much! I can load in dishes that usually takes hours to cook into the pressure cooker and it’s done in a fraction of the time. Not to mention, I can do it all in one pot. This especially comes in handy during Thanksgiving when I have a full spread to prepare. Today, I’ll show you how to create the BEST greens you’ve ever had in a pressure cooker!
Pot Liquor!
Some other recipes would put everything in the pressure cooker at once. But, I like to pressure cook the meat first to create a nice stock or “pot liquor” for the greens. My family and I are pork free. So, I use smoked turkey necks in my greens. Feel free to use any meat you’d like.
30 minutes of pressure cooker will render a beautiful stock and base for our greens. The meat will be slightly tender. But, they won’t be where we want it just yet. I leave the meat in during the cooking process of the greens. Doing so will ensure that that meats slides off the bone!
Rinse and Repeat…
I’m using Mustard greens for this recipe since they are my favorite. You may use any greens you’d like. Collards, turnip, a mix, it’s all up to you. I have a full tutorial on how I clean my greens and cut them up. Be sure to check out those instructions: https://coopcancook.com/southern-collard-greens/
Pack those greens into the pressure cooker. Don’t worry if they seem to overcrowd the insert. They will cook down. I also keep the seasoning very simple. You don’t need a lot of extra stuff to make delicious greens!
Melt in Your Mouth Goodness!
Prepare your taste buds for these melt in your mouth greens! How easy was this method? It is even faster than cooking them on the stove. Try it! I bet you won’t ever go back to the old way. Don’t forget the cornbread!
Southern style Greens made with ease in a Pressure Cooker. Tender, melt in your mouth greens in a savory pot liquor created by fall off the bone smoked turkey necks.
Ingredients
2-3bunches greens of your choicewashed and cut
1lbsmoked turkey necks
1 1/2cupwater
1diced onion
1Tcreole or cajun seasoning
1tspapple cider vinegar
2Tonion powder
1Tgarlic powder
Instructions
Place the turkey necks into pressure cooker with the water*
Close and lock lid
Ensure that pressure releasing valve is locked
Pressure cook on HIGH for 30 mins
Unlock the pressure releasing valve
Add in the remaining ingredients
Close and lock lid
Ensure that pressure releasing valve is locked
Pressure cook on HIGH for 45 mins
Unlock the pressure releasing valve
Stir well
Taste and adjust seasoning as needed.
Enjoy!
Recipe Notes
*Use the minimum amount of water needed for your pressure cooker to work properly. See your pressure cooker manual for instructions. If you need to use more water than the recipe calls for, add more.
I love Italian food. No, I really, really love it! Mainly because many of the dishes contain cheese. Cheese is the only reason I can’t adapt to a vegan lifestyle. I need it! Thus, my excitement to share my fusion of Italian and Creole goodness. I must warn you. This Seafood Lasagna is extremely rich! In taste and in price. These ingredients aren’t cheap. But, that’s what makes this dish a special treat for special occasions. Trust me, it’s worth every dollar, minute, and calorie!
Greens Erase Guilt…Sort of.
I added spinach to cut the decadence a little. Okay, I added it to make me feel less guilty over making this richer than rich masterpiece. Again, this is a meal for a special occasion. It’s a treat meal. Also, why does spinach have to disappear? Three dang bags turn into a handful once wilted! Whatever.
86 the Ricotta
My Italian Cookies are going to be angry. But, I am NOT a fan of ricotta cheese! I know, I know. So, I’ve created a cream cheese mixture to use in its place. I promise you won’t miss that thick, rocky ricotta!
Layering the lasagna is my favorite part! Oh! I almost forgot. I boiled the lasagna sheets in water with a splash of liquid crab boil for a kick of heat and flavor! A little step that makes a huge difference. Don’t overcook the noodles. Just boil until al dente. Remember, we still have to bake this stuff.
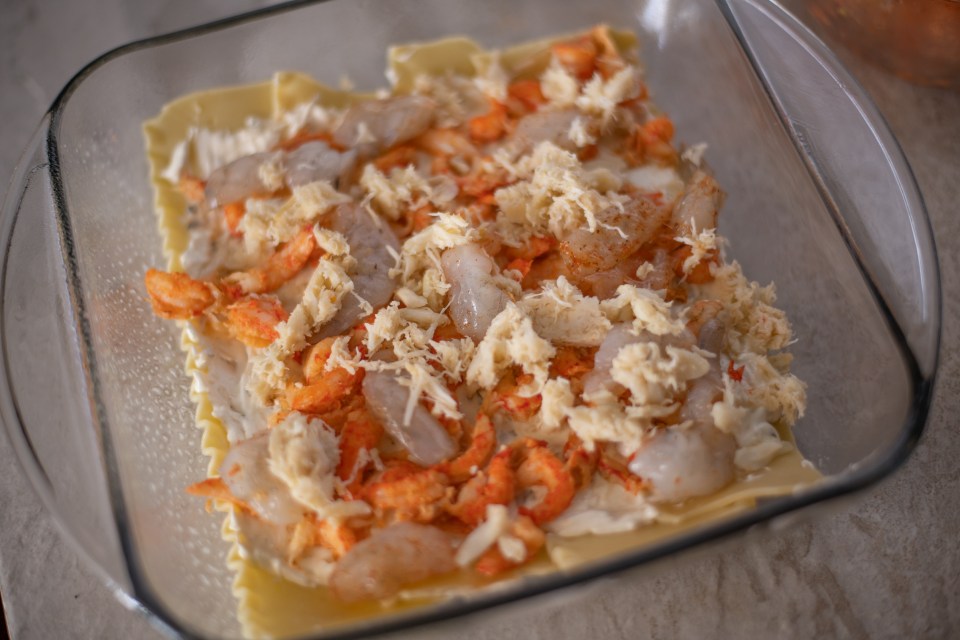
Bring on the Sea Creatures!
Can’t have Seafood Lasagna without seafood, of course. I use shrimp, crawfish, and lump crab meat. Man! The Creole seasoning is all you need to flavor up the seafood. Be careful with the crab meat. It’s very delicate. We don’t want to mix it in too roughly and cause it to break a part. It’s not cheap, so we want to taste ALL of it.
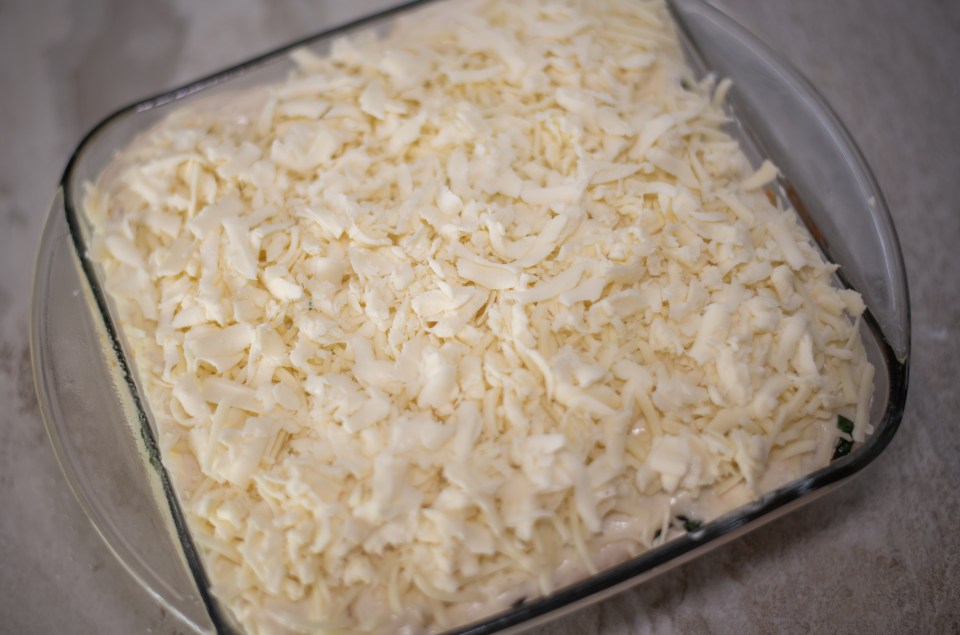
Cheese Me, Seymour!!
Gold star to whoever can name that movie reference. We need cheese, cheese, and more cheese! I was not shy when it came down to this part. I used fresh Mozzarella and Fontina cheeses. Fontina can be a little tricky to find in some stores. Feel free to substitute it for Monterrey Jack or Muenster. If you’ve ever tried to shred fresh Mozzarella, you already know it’s a pain. There’s a trick to it. Pop it into the freezer for 30 mins to an hour before shredding. Tah-dah!
Look What Jesus Did!
Moment of Silence for this Seafood Lasagna! 40 minutes of baking, 5 minutes of broiling, and 15 minutes of cooling is all that stands between you and flavor heaven! I made a smaller serving just to show you guys how it’s done. The recipe below makes a larger serving. It’s you’d like to make the same 8×8 serving I made, just cut the recipe below in half.
This Seafood Lasagna is sure to be a crowd pleaser! Perfect addition to your Thanksgiving spread too!
A Cajun take on an Italian classic. Flavorful shrimp, crawfish, and crabmeat covered in cheese and a rich, creamy Alfredo sauce!
Prep Time30minutes
Cook Time45minutes
Total Time1hour15minutes
Ingredients
Lasagna
1lblasagna sheets
1TBSliquid crab boil
1lbmedium shrimp
1lbcrawfish tails
16ozlump crabmeat
1TBSCreole or Cajun seasoning
1TBSolive oil
2cupsfresh spinach
1/2tspsalt
2cupshredded Mozzarella
1cupshredded Fontina or Muenster cheese
Sauce
5TBSbutter
1TBScrushed garlic
1/3cupflour
2 1/2cupshalf and half
1/2cupchicken stock
1tspliquid crab boil
Creole seasoning and cracked black pepper to taste
1cupshredded Parmesan cheese
1TBSfresh basil
Filling
8ozGarlic & Herb cream cheese
8ozsour cream
1cupshredded Parmesan cheese
1TBSfresh basilchopped
Instructions
Lasagna
Boil lasagna until al dente according to package instructions. Pour the liquid crab boil into the water as it boils. Drain and set aside
In a bowl, combine all seafood.
Add Creole or Cajun seasoning evenly to the seafood. Set aside.
Heat the olive oil a pan over medium high heat
Add in the spinach and a pinch of salt
Sauté until Spinach has wilted
Remove spinach from the pan and set aside
Sauce
Preheat oven to 375 F
Add the butter into the same pan used for the spinach
When the butter melts, add in the garlic and saute for 30 secs
Stir in the flour and continue stirring for 1 minute
Pour in the chicken stock and half and half while stirring
Now, use a whisk to continue to mix the sauce while it heats and thickens.
Season the sauce to taste using creole seasoning and black pepper
Pour in the liquid crab boil
When the sauce has thickened, stir in the Parmesan cheese.
Remove from heat when the cheese melts.
Filling
Mix all filling ingredients in a bowl.
Set aside.
Assembly
Spray a lasagna pan with nonstick cooking spray
Ladle a thin layer of sauce at the bottom of the pan
Then, overlap a layer of lasagna noodles over the sauce
Spread on 1/3 of the filling over the noodles
Then, add 1/3 of the seafood and spinach
Sprinkle on 1/3 of the Mozzarella & Fontina cheeses
Pour on 1/3 of the sauce
Continue those steps 2 more times until you have 3 layers.
Bake, on the center rack of the oven, uncovered for 35-45 mins. Then, broil on high for 3-5 minutes until the cheese is as brown as you’d like.
Sprinkle on the fresh basil
Allow the lasagna to cool for at least 15 minutes before serving
Enjoy!
Recipe Notes
This recipe is to be used with a standard lasagna pan. (approx. 12 in wide x 16 in long x 3.5 in deep) Using a different size pan may alter the number of layers. To make a smaller serving as I did in the photos, use an 8 x 8 dish and cut measurements of the sauce and filling ingredients in half. Use the same amount of seafood the recipe calls for. Baking time will be the same.
Nashville! God bless you good people! Whoever developed this idea, whew! Greatness. I love spice. And this chicken has it all! There was a lot of love put into my version of this recipe. I wanted the chicken to be crunchy, moist, and spicy without being overwhelming. When food is too hot, it can sometimes take away from the other flavor components. But, in my recipe, you can taste every spice equally!
Bring on the HEAT!
It’s very important to seasoning your chicken wings really well before pouring in the buttermilk. I don’t know if it even matters, but I like to ensure that the chicken is coated in spices first. In my head, the buttermilk will act as a binding agent and glue those seasonings to the bird. Sounds legit, right?
Batter Up!
To avoid overly salting our wings, I only add a little bit of celery salt to the flour. I’m using self-rising flour, because it contains just enough baking powder to make our wings extra crispy and crunchy! Be sure to press the flour into the chicken gently while dredging. We don’t want that batter slipping off in the oil.
Using a cooling rack to drain the excess oil off the chicken is essential in preserving the crispiness of the chicken wings. It allows air to circulate around the entire wing. And it makes the next step of brushing on the sauce easier.
Just Right…
Guys, I worked super hard on the measurements and ingredients for the spice blend of the sauce. Again, I didn’t want the heat overpowering the rest of the flavors. But, we are making Nashville HOT chicken wings! It has to have to some heat. And my blend definitely packs it on!
This is my favorite part! I love mixing the hot oil we used to fry the chicken into the spices! This is where all of the magic happens! If oil doesn’t completely soak of the spices. It makes them spreadable per say. Therefore, you can slightly feel the grains of the spice on your fingers when you grab a wing. It’s fiery goodness!
You can spoon on the sauce or toss the wings in it. I chose to brush the sauce on. I didn’t want to disturb that crunchy texture of the chicken. Fearing that if I tossed it, some of the crispy bits would fall off. And we only want those morsels fall into our mouths!